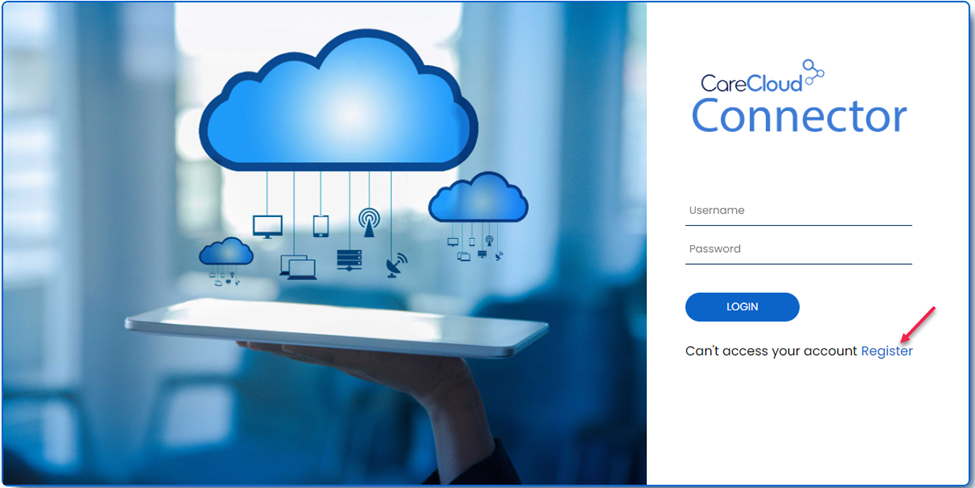
Creating a Developer Portal Account
- Navigate to Dev Center
- Click on Register and then add the information as shown in step 3.
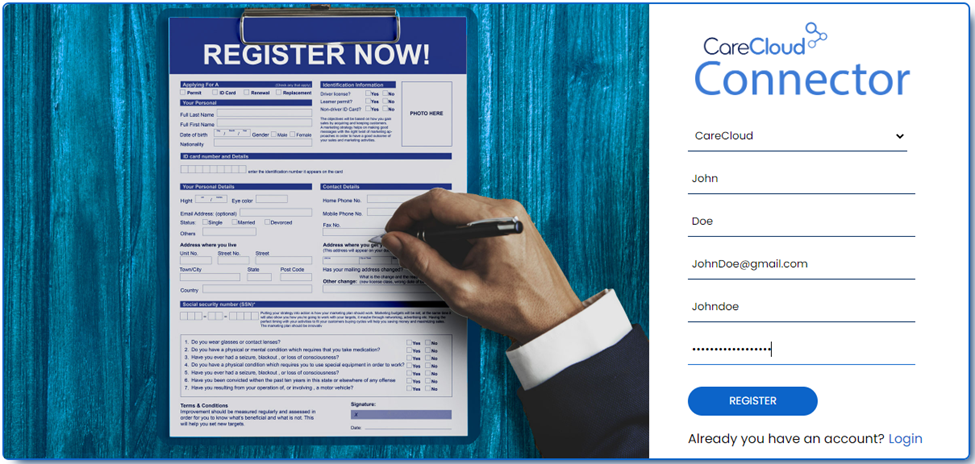
- Enter the following details to create an account:
- Care Cloud: Select application Care Cloud, MTBC or Meridian
- First Name: Enter your first name.
- Last Name: Enter your last name.
- Display Name: Enter the name that will be displayed for your account.
- Password: Enter the password.
-
Select Register to create your new developer portal account.
- You will view successful account creation popup.
Login in to Developer Portal
Overview: During this procedure, you will understand the procedures necessary to login in to the Developer Portal.
Log in to Developer Portal
- Navigate to the Dev Center.
- Enter the username used to create your account. For example, john.doe@gmail.com.
- Enter the password used to create your account.
- Select the Log in button and the Developer Portal screen is displayed.
Note: Your display name should now appear in the top right corner of the screen.
Create an application
During this procedure you will use Developer Portal to create a new application.
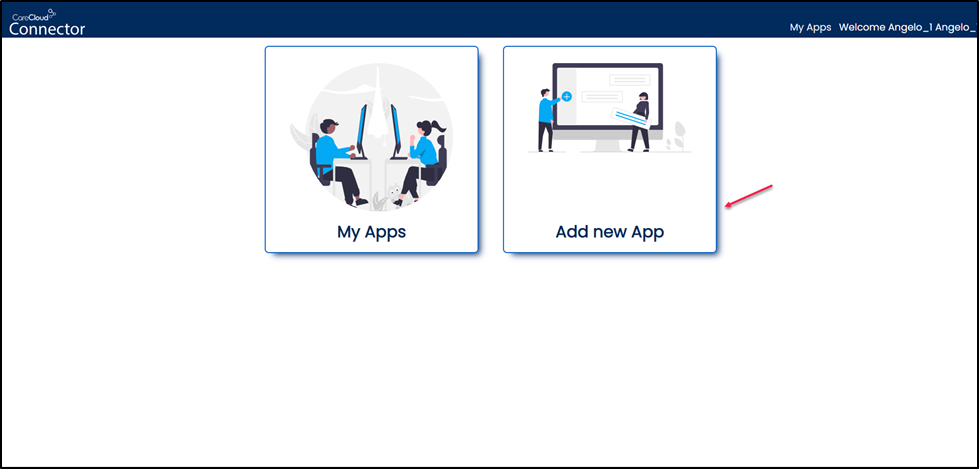
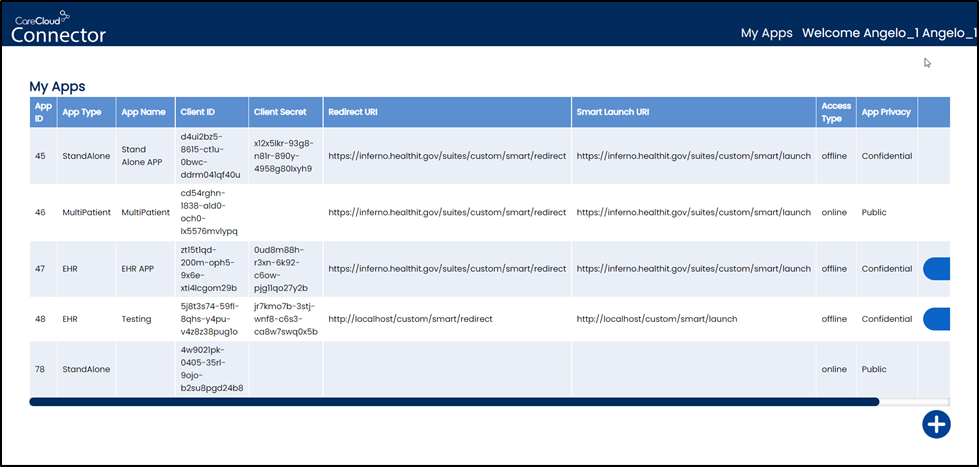
- Select Add New App widget and the Register New App screen appears.
- Enter the following details to create your new application:
- App Type: Select the App Type from one of these options.
(1-Stand Alone, 2- Multi Patient & 3-EHR
Note: Selecting Multipatient from App Type will show an additional field JSON WEB Key Set as shown in given below image.
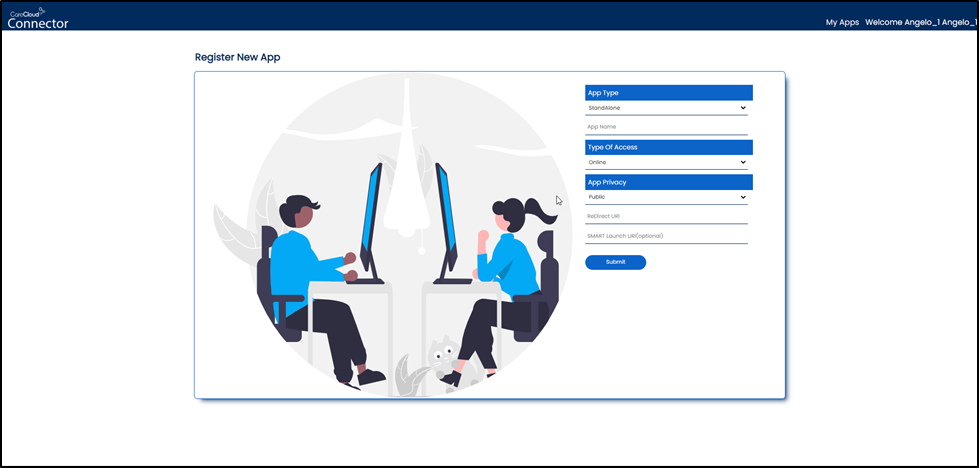
- App Name & Version: Enter the name of your application. For example CareApp 1.0.0
- Type of Access: Select the Type of Access from one of these options.(1-Online, 2-Offline)
- App Privacy: Select the App privacy type from one of these options (1-Public. 2-Confidential)
- Redirect URLs: A redirect URL is the location (URL) where the client is sent after successful account authentication.
Example: Your redirect URL is https://httpbin.org/anything. When you successfully log in to the system, your user credentials are authenticated, and a response is sent back to the redirect URL. The header of the response carries the authorization code that can then be used in obtaining an access token (see section below).
- Note: A Microsoft service authenticates user credentials using the redirect URLs entered here to send the response, including token, back to your application. This token can subsequently be used by your application to make API calls to access data.
- SMART Launch URLs (Optional):Enter the SMART URL for your application.
- Select the Submit button.
- The My App page displays the newly added application with the given below information
Client ID and Client Secret displayed; these will be required later to access the APIs and place the API call.
- Copy the Client ID value and paste it into a text document.
Note: This value will be required when constructing the Access My Data URL and generating the access token.
- Select the Copy icon above the Client Secret to copy this value to the dashboard and paste it into a text document for future use.
Note: This value will be required when generating the access token.
- IMPORTANT:
Select the Close button and the application displays in the My applications screen.
Generating the Authorization Code
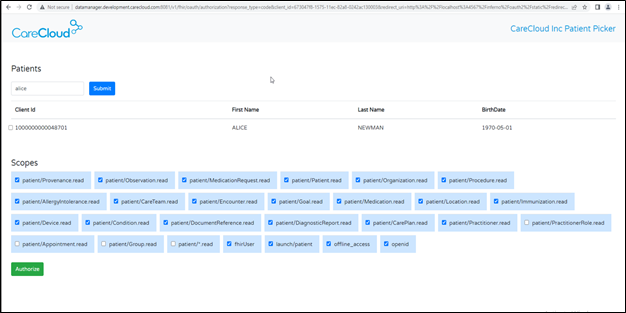
Note: The Client ID and Client Secret Key & Redirect URL used to access patient resources with new developed application setup. If the Client ID and Client Secret Key matches with the assigned one then the given below screen will appear.
- The Patient Access screen displayed.
- Enter one or more of the available search parameters:
- First Name: Searches for patients by the entered first name.
- Last Name: Searches for patients by the entered last name.
- Date of Birth: Searches for patients by the entered or selected birth date.
- Patient ID: Searches for patients by the entered patient ID.
- Select the Submit button to display a list of all patients matching the entered search parameters.
Note: You may simply select the Submit button to display a list of all patients.
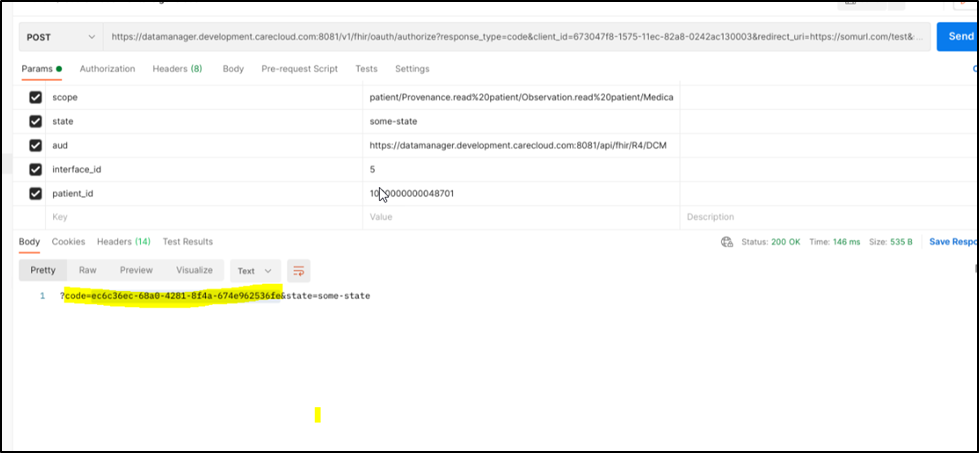
- Select a Patient Check box button next to a patient to be accessed and click on Authorize button.
This adds a URI for the selected patient and displays the patient’s authorization code.
IMPORTANT:
Note: The above sample call to the authorize endpoint requests an access token for a specific patient context by specifying the OAuth2 scopes for patient context (patient/*.read and launch/patient). These scopes will prompt you to select a patient. If you do not want to establish a patient context with your access token, then you may use other scopes that are available as part of the SMART® on FHIR® standard.
See Scopes and Launch Context on the SMART® technical documentation website.
Copy the patient’s authorization code into a text document for later reference.
Generating Access Token
Now you are ready to make API calls. The following section provides several sample calls in Postman to illustrate how different APIs can be invoked.
First, we will use the authorization code generated for a specific patient to generate an access token. An Access token is the secure key used to read the patient records.
Before you start
Locate the following required variables:
- Client ID – From your developer account.
- Client secret – From your developer account.
- Redirect URL – From your developer account.
- Patient Authorization code – Generated during the previous procedure
- Provider Authorization code – Generated during the previous procedure.
Generate an access token
- Open Postman, create a blank tab and the Untitled Request screen is displayed.
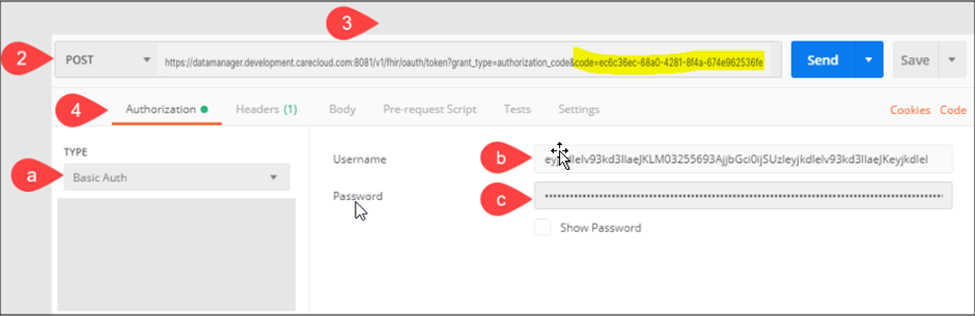
- Select POST.
- Enter this URL
into the Request URL field
- Select the Authorization tab then enter the following into the Authorization screen:
- Select Basic Auth from the Type drop-down field.
- Copy the client ID generated when you created the application in Developer Portal and paste it into the Username field.
- Copy the client secret generated when you created the application in Developer Portal and paste it into the Password field.
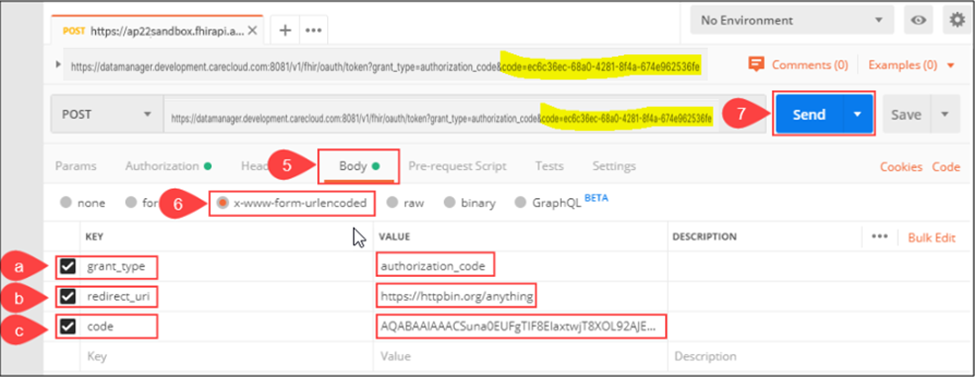
- Select the Body tab and the Body screen is displayed.
- Select the x-www-form-urlencoded radio button and add the following keys and values into the body of the POST request:
| No. |
Key |
Value |
| a. |
grant_type |
authorization_code |
| b. |
redirect_uri |
<redirect URL entered when the application was created in Developer Portal > |
| c. |
code: |
<authorization code (Patient or Provider) from previous step > |
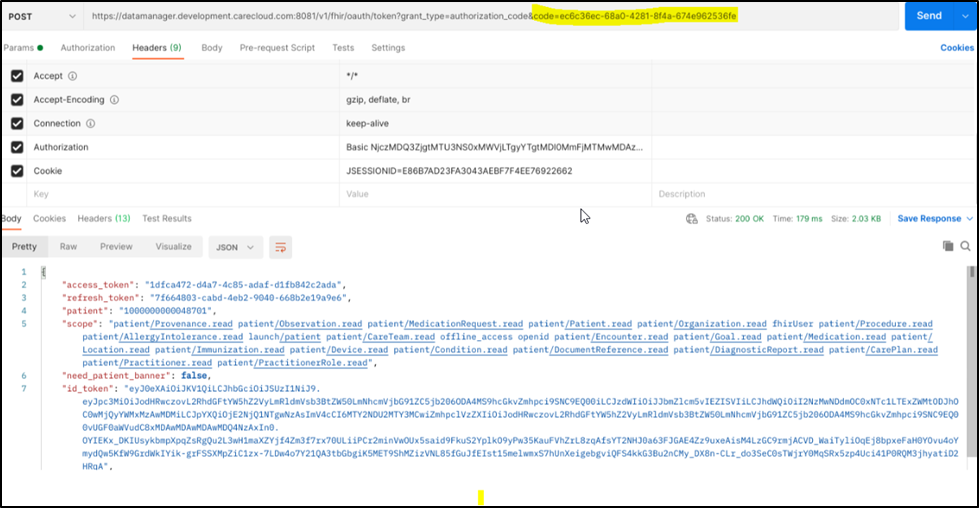
- Select the Send button and the access_token is generated
- Copy the access_token and patient_id to a text document for later use.
Accessing APIs
During this procedure, you will configure Postman using the access_token and patient_id to access APIs and view patient information.
Before you start
Locate the following required variables:
- patient_id - Copied during the previous procedure.
- access_token - Generated and copied during the previous procedure.
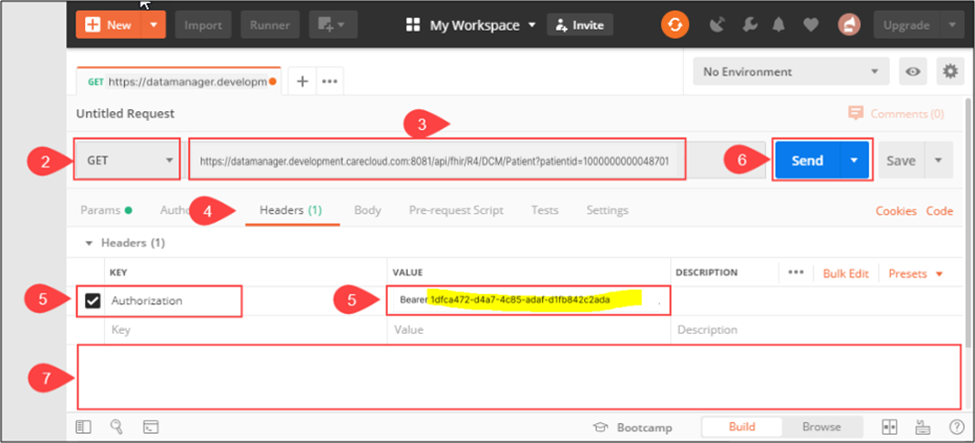
Consume token to access APIs
- Create a new tab within Postman.
- Select GET.
- Enter the following address into the Request URL field:
patientid=<patientidvalue> and replace <patientidvalue> with the patient_id copied in the previous procedure.
patientid=1000000000048701
- Select the Headers tab.
- Add a new key named Authorization with a value of Bearer <access_token>
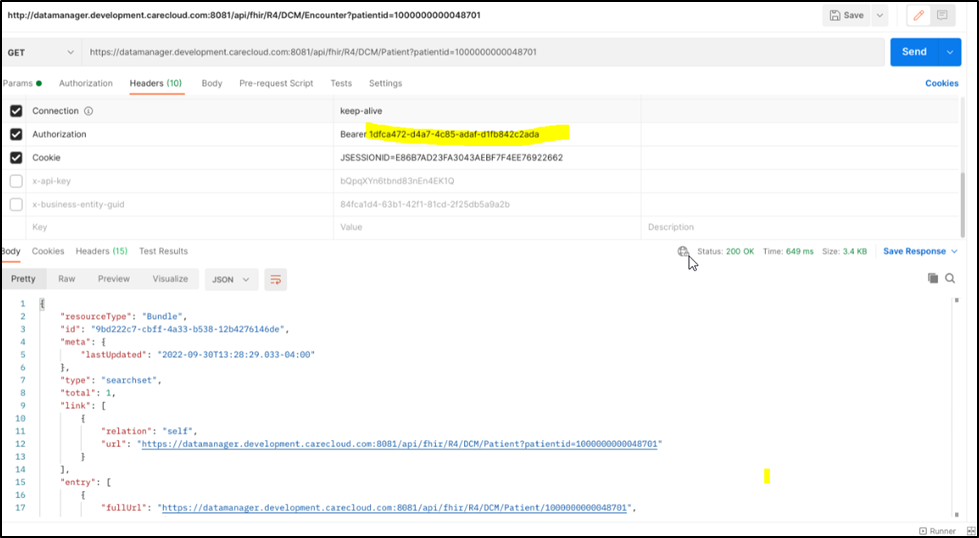
- Select the Send button.
- The OperationOutcome result appears indicating the patient’s data can now be accessed via the API.
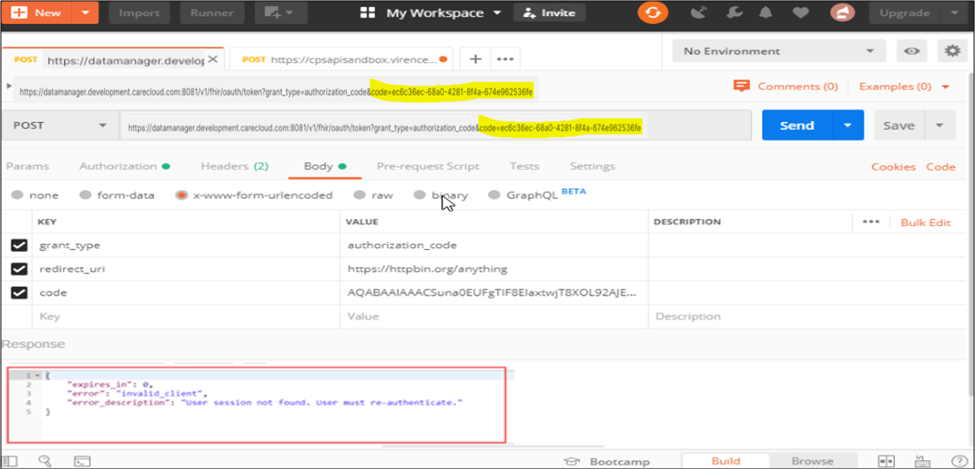
Troubleshooting
User session not found. User must re-authenticate.
This error indicates the Microsoft authentication has timed out and the authorization code has become invalid.
To resolve this issue, you must re-generate the authorization code, replace the previous code value within Postman with this new code and select the Send button to successfully generate the access token.